论使用WebCodecs对视频进行处理
原文 更新于 2022-02-10,由 Aloento 翻译,具体以原文为准
现代的 Web 技术为视频提供了丰富的处理能力,例如 Media Stream API、Media Recording API、Media Source API, 和 WebRTC API 等,它们提供了丰富的工具以便 录制、传输、回放视频流。
这些 API 虽然封装了很多高级功能以便方便的完成既定任务,但它们并不能让你处理视频流的内部细节,如 按帧处理 和 处理未 Muxed 的视频或音频块等。
为了实现以上目的,你不得不使用一些类似 WebAssembly 的方式来把浏览器本就自带的编解码器(通常它们都有硬件加速)又一次的引入,这属实是对资源的浪费。
而 WebCodecs API 为程序员提供了使用浏览器自带编解码器的能力,来提高你的工作流效率,具体而言:
- 音视频的编解码
- 视频原始帧
- 图像解码
WebCodecs API 对于需要完全控制媒体内容处理方式的场景是非常有用的,例如视频编辑、视频会议、视频流等。
视频处理工作流
帧 是视频处理的基本单位,因此,在 WebCodecs 中,大多数类要么使用帧,要么产生帧。编码器将帧转为编码的 chunks(块),而解码器则做相反的事情。VideoFrame 有一个可以接受 CanvasImageSource 的构造函数来于其他的 Web API 很好的配合。所以它可以被用于 drawImage() 和 texImage2D() 等函数中. 此外,它还可以从 canvases, bitmaps, video elements 和 其他 video frames 中创建。
WebCodecs API 可以用 Insertable Streams API,让 WebCodecs 和 media stream tracks 一起工作。
MediaStreamTrackProcessor将媒体流分解为单个帧。MediaStreamTrackGenerator从帧序列中创建媒体流。
WebCodecs 和 Web Workers
按照设计,WebCodecs API 以异步方式在主线程之外完成所有繁重的工作。但是由于帧和 Chunk 的回调经常在一秒之类被调用多次,这可能导致主线程的混乱,导致网页 UI 的缓慢和卡顿,所以我们最好将处理工作放到 Worker 线程中。
而 ReadableStream 有一个简便的方法可以将来自媒体流的帧全部自动转移到 Worker 线程中,例如,从摄像头的来的流通过 MediaStreamTrackProcessor 获取到 ReadableStream 后,就可以在 Worker 线程中被 VideoEncoder 处理。
我们甚至可以通过 HTMLCanvasElement.transferControlToOffscreen 在主线程之外进行渲染。但如果所有的高级接口都不满足你的需求,VideoFrame 本身也是可以在不同的 Worker 中转移的。
WebCodecs 的编解码
Encoding / 编码
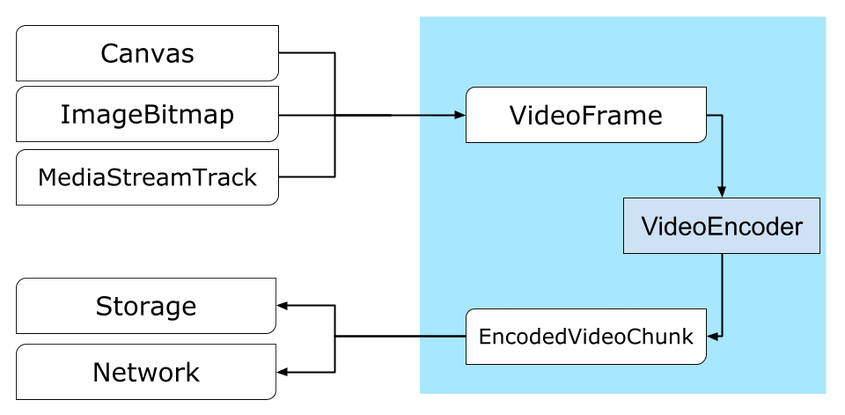
我们从 VideoFrame 开始,有三种方法来构建视频帧。
- 从图片源,如 canvas, image bitmap, 或 video element.
1 | const canvas = document.createElement("canvas"); |
- 使用
MediaStreamTrackProcessor从MediaStreamTrack中提取帧
1 | const stream = await navigator.mediaDevices.getUserMedia({…}); |
- 从
BufferSource中的原始二进制像素中创建帧
1 | const pixelSize = 4; |
无论它们来自哪里,帧都可以用 VideoEncoder 编码为 EncodedVideoChunk。
而 VideoEncoder 需要两个参数:
- 两个函数,用来处理已编码数据块和产生的错误,传入后不可变。
- 编码器配置,用来配置输出的视频流参数,可以使用
configure()进行修改。
如果你指定的配置不被浏览器支持,configure() 方法将抛出 NotSupportedError。
所以我们建议你调用异步静态方法 VideoEncoder.isConfigSupported() 来预先检查你的配置是否被用户的浏览器支持。
1 | const init = { |
编码器设置好以后,你就可以通过 encode() 方法来传入帧了。configure() 和 encode() 都不需要等待实际工作结束,它们会立刻返回。
编码器允许多个帧同时排队等待编码,encodeQueueSize 表示队列中有多少帧还未处理。
如果你传入的参数或调用方法的顺序不正确,则方法可以立刻抛出错误,也可以通过你设置的 error() 回调函数报告错误。
如果编码成功,就会调用你设置的 output() 回调函数。
这里需要强调一点,如果你的帧不再使用,你应该调用 close() 来释放资源。
1 | let frameCounter = 0; |
最后,我们编写一个处理从编码器中得到的 Chunks 的函数,来完成最终的编码。
一般来说,这个函数会把 Chunk 发往服务器,或者将 Chunk Muxing 到一个容器中来生成一个视频文件。
1 | function handleChunk(chunk, metadata) { |
如果你需要确保所有的编码请求都已经完成,你可以调用异步函数 flush()。
1 | await encoder.flush(); |
Decoding / 解码
设置 VideoDecoder 的方法与设置 VideoEncoder 的类似:在创建解码器的是否传入两个参数,并调用 configure() 修改解码器参数。
解码器的参数会因编码器的不同而不同,比如一个 H.264 解码器可能需要一个 AVCC 格式的二进制 blob,除非流是以 Annex B 编码的。
(encoderConfig.avc = { format: "annexb" })
1 | const init = { |
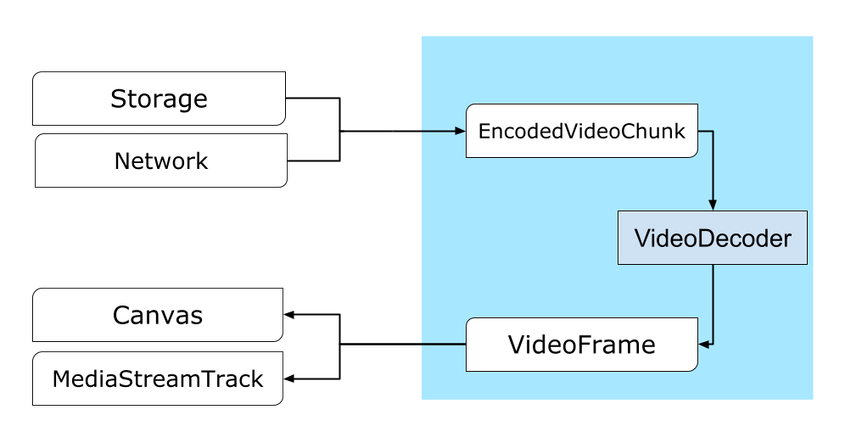
在准备好解码器后,你需要给它一个 EncodedVideoChunk。要创建 Chunk,你需要:
- 一个编码视频数据的
BufferSource - Chunk 的开始时间戳,单位是微秒(Chunk 中第一个编码帧的媒体时间)
- Chunk 的类型:
key,如果 Chunk 可以独立于之前的数据块进行解码,则为关键帧类型deltaChunk 必须在其他块被解码以后才能被解码
编码器产生的所有 Chunk 都是可以用解码器解码的。
之前提到的错误报告和方法的异步等事项,对解码器也是如此。
1 | const responses = await downloadVideoChunksFromServer(timestamp); |
现在,我们把解码好的帧展现在页面上。最好确保解码器的输出回调函数(handleFrame())迅速返回。
在下面的例子中,它只是将一个帧添加到准备渲染的帧队列中。
渲染是独立进行的,由两个步骤组成:
- 等待合适的时机来展示帧
- 在 Canvas 上绘制帧
一旦帧不再被使用,就调用 close() 来在 GC 之前释放底层内存,这将减少平均内存使用量。
1 | const canvas = document.getElementById("canvas"); |
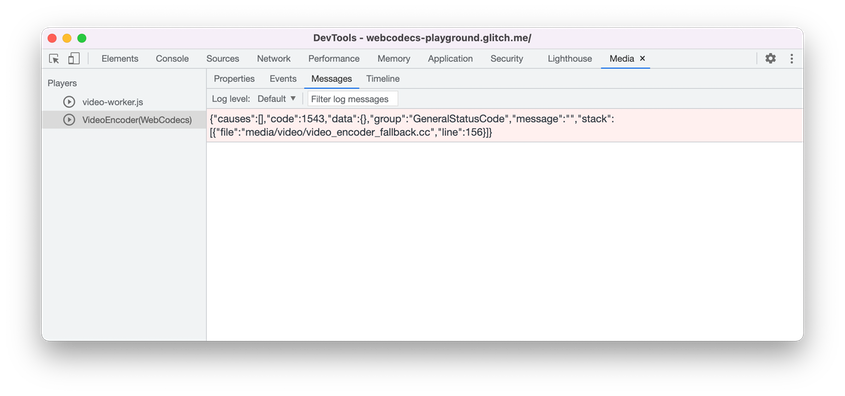
Dev Tips
在 Chrome DevTools 中使用 Media Panel,查看媒体日志和调试 WebCodecs。
Demo
下面这个例子展示了 Canvas 上的动画是如何被:
- 通过
MediaStreamTrackProcessor以 25fps 的帧率采集到ReadableStream中 - 转发到 Worker 线程
- 编码成 H.264 的视频
- 再次解码为帧序列
- 使用
transferControlToOffscreen()在另一个 Canvas 上渲染
Other demos
Also check out our other demos:
使用 WebCodecs API
兼容性检查
检查对 WebCodecs 的支持:
1 | if ("VideoEncoder" in window) { |
请注意,WebCodecs API 只在 secure contexts 下运行,所以如果 self.isSecureContext 是 false,则检测会失败。
Feedback
The Chrome team wants to hear about your experiences with the WebCodecs API.
Tell us about the API design
Is there something about the API that doesn’t work like you expected? Or are
there missing methods or properties that you need to implement your idea? Have a
question or comment on the security model? File a spec issue on the
corresponding GitHub repo, or add
your thoughts to an existing issue.
Report a problem with the implementation
Did you find a bug with Chrome’s implementation? Or is the implementation
different from the spec? File a bug at new.crbug.com.
Be sure to include as much detail as you can, simple instructions for
reproducing, and enter Blink>Media>WebCodecs in the Components box.
Glitch works great for sharing quick and easy repros.
Show support for the API
Are you planning to use the WebCodecs API? Your public support helps the
Chrome team to prioritize features and shows other browser vendors how critical
it is to support them.
Send emails to media-dev@chromium.org or send a tweet
to @ChromiumDev using the hashtag#WebCodecs
and let us know where and how you’re using it.
论使用WebCodecs对视频进行处理